Brewing with yeast slurry is a cost-effective and sustainable way to produce high-quality beer. This article will cover everything you need to know about using yeast slurry in brewing, including how to collect, store, and pitch it into your beer.
Yeast is a crucial ingredient in brewing beer, responsible for converting the sugars into alcohol and carbon dioxide during fermentation. As a brewer you have the option to use fresh yeast, dry yeast, or yeast slurry in the brewing process. Brewing with slurry, also known as yeast cake or yeast trub, can be a cost-effective and convenient way to make delicious beer.
Table of contents
- What is yeast slurry and how do you collect?
- The advantages of reusing slurry
- How to store yeast slurry for later use
- Pitching the slurry into a new batch of beer
- Adjusting for pitch rate and fermentation characteristics
- Common mistakes when using yeast slurry and how to avoid them
- Troubleshooting fermentation issues with reusing yeast slurry
- Yeast washing vs. direct pitching: pros and cons
- FAQ about harvesting and reusing yeast
What is yeast slurry and how do you collect?
Yeast slurry is a thick suspension of yeast cells in water that collects at the bottom of the fermenter after fermentation. It contains a high concentration of healthy yeast cells. Therefore it is an ideal source for pitching into a new batch of beer. Collecting yeast slurry is a simple task. You have to transfer the beer from the fermenter to a bottling bucket or keg, leaving the yeast at the bottom of the fermenter. It is essential to avoid transferring any trub, which can lead to off-flavors in the new batch of beer.
ADvertisement
The advantages of reusing slurry
There are several advantages to using yeast slurry in brewing. One significant benefit is cost savings. Yeast slurry is a free source of yeast for homebrewers, making it an affordable alternative to purchasing fresh yeast. Additionally, using slurry can save time as it eliminates the need to rehydrate dry yeast or make a yeast starter. Another advantage of using yeast slurry is that it can produce a faster and more vigorous fermentation. Especially when compared to using fresh yeast, which can lead to a quicker turnaround time for your beer.
How to store yeast slurry for later use
Storing yeast slurry properly is essential to maintain yeast health and viability. Yeast can be stored in a sanitized container in the refrigerator for up to a month. For longer storage, yeast can be frozen in small portions using glycerin to protect the yeast cells. When thawing frozen yeast, it is essential to slowly acclimate the yeast to the temperature of the wort to prevent thermal shock, which can damage the yeast cells.
Pitching the slurry into a new batch of beer
When pitching yeast slurry into a new batch of beer, it is essential to adjust the pitch rate based on the OG (original gravity) of the beer and the volume of the batch. Generally, a pitch rate of 1 million cells per milliliter of wort per degree Plato is recommended for ales, while lagers may require a higher pitch rate. Underpitching yeast can lead to slow or stuck fermentations, while overpitching can result in off-flavors and reduced yeast activity.
It’s important to use the proper amount when it comes to pitching yeast slurry into your wort. As a general rule of thumb, use 50-75% of the slurry from your previous batch for the next batch. For example, if you collected 400ml of yeast slurry from your last batch, use 200-300ml for your next batch.
Adjusting for pitch rate and fermentation characteristics
To adjust for pitch rate and fermentation characteristics, you can use various calculators and brewing software to determine the appropriate amount of yeast slurry to pitch into the new batch of beer. Factors such as the age and health of the yeast slurry, fermentation temperature, and yeast strain can also impact the fermentation characteristics of the beer.
Common mistakes when using yeast slurry and how to avoid them
While using yeast slurry can be a great way to save money and improve the quality of your beer, there are some common mistakes that brewers make when working with slurry. Here are a few tips to help you avoid these issues:
- Using old or contaminated slurry: Make sure that your slurry is fresh and free of contamination before using it in your beer. If you are unsure, it’s best to start with a fresh batch of yeast.
- Not adjusting for pitch rate: The pitch rate of yeast is crucial to the success of your beer. Make sure that you are adjusting your pitch rate based on the needs of your beer and the characteristics of your yeast.
- Over-pitching: While under-pitching can cause fermentation issues, over-pitching can also be problematic. It can lead to off-flavors, poor attenuation, and other issues.
- Poor storage conditions: Make sure that you are storing your yeast slurry properly to avoid contamination and other issues.
The Golden Rules for Slurry Success
Now that you know how to harvest your yeast, it’s vital to know which slurry is worth your time. Not every yeast cake is fit for a second round.
Mind the “Family Tree” of Your Beer
Yeast has a memory. If you harvest yeast from a heavy Imperial Stout and pitch it into a crisp Pilsner, you’re going to taste the remnants of those dark malts and hop bitterness. The golden rule here is: work from light to dark. Pitch yeast from a Blonde into a Dubbel, or from a Dubbel into a Stout. Doing it the other way around risks muddying the color and clarity of your brew.
Avoid the “Alcohol Hangover”
Yeast is a living organism, and it gets tired. Yeast that has just finished fermenting a beer with 9% or 10% ABV is often exhausted by osmotic pressure and alcohol toxicity. These cells are less vital and may struggle to kick off a new fermentation. For the best results, try to harvest from “sessionable” beers with an ABV under 7%.
How Much Slurry Do You Actually Need?
A common rookie mistake is dumping the entire yeast cake from your previous batch into the new one. This is called overpitching. While it sounds safe, it can actually lead to a “characterless” beer because the yeast doesn’t have to work hard enough to produce those tasty esters we love.
For a standard 5-gallon (19-20 liter) batch, follow these guidelines:
- Fresh Slurry (0-1 week old): Roughly 150 ml to 200 ml of the thick, creamy layer is usually plenty.
- Older Slurry (2-4 weeks old): Aim for 300 ml to 400 ml, as some cells will have gone dormant or died off.
Pro-Tip: If your slurry has been sitting in the fridge for more than a month, don’t pitch it directly. Instead, make a small yeast starter to test its vitality. If the starter shows healthy activity within 24 hours, your yeast is officially back in the game!
Troubleshooting fermentation issues with reusing yeast slurry
If you do experience fermentation issues when using yeast slurry, there are a few things that you can do to troubleshoot the problem. Here are a few tips:
- Check your pitch rate: If you are experiencing slow or stuck fermentation, it could be due to an insufficient pitch rate. Check to make sure that you are pitching enough yeast for the needs of your beer.
- Check your yeast health: If your yeast is unhealthy, it may struggle to ferment your beer. Make sure that your slurry is fresh and free of contamination.
- Check your fermentation temperature: Yeast is sensitive to temperature, and if the temperature is too high or too low, it can lead to fermentation issues.
Yeast washing vs. direct pitching: pros and cons
While yeast slurry is a great way to save money and improve the quality of your beer, there are other methods of working with yeast as well. Two common methods are yeast washing and direct pitching. Here are the pros and cons of each:
Yeast washing involves separating the yeast from other materials in the slurry, such as hops and trub. This can help to improve the health of the yeast and reduce the risk of contamination. However, it can be time-consuming and may not be necessary if you are using a fresh batch of yeast.
Direct pitching involves pitching the entire slurry into your beer without any additional preparation. This can save you time and effort. However it can also increase the risk of contamination and may not be suitable for all beer styles.
To Wash or Not to Wash?
You’ll often see “yeast washing” (adding water to separate the yeast from the trub) mentioned in older brewing manuals. While those clean white layers look great in a Mason jar, there are two hidden risks:
- Contamination Risk: Every time you add water or transfer the yeast, you expose it to the open air.
- Osmotic Shock: Pure distilled or tap water can actually stress and damage the yeast cell walls.
The Modern Alternative: Just pitch the slurry “dirty.” The small amount of trub and hop debris at the bottom of your jar will have negligible impact on the flavor of your new batch. It’s safer, faster, and the yeast stays much happier.
Harvesting yeast from different beer styles
Different beer styles can produce different strains of yeast, each with its own unique characteristics. Here are a few tips for harvesting yeast from different beer styles:
- Ales: Ale yeast is typically more top-fermenting and produces fruity or spicy flavors. It can be harvested from ales such as IPAs, stouts, and porters.
- Lagers: Lager yeast is typically bottom-fermenting and produces clean, crisp flavors. It can be harvested from lagers such as pilsners, bocks, and Vienna lagers.
FAQ about harvesting and reusing yeast
Technically, yes, but it’s risky. A stall usually means the yeast struggled due to temperature swings, low nutrients, or high alcohol. Reusing “stressed” yeast is like asking a marathon runner to sprout a sprint right after they’ve hit the wall. For the best results, only harvest from healthy, vigorous fermentations that finished on time.
Most homebrewers find the sweet spot to be 4 to 6 generations. Beyond that, the yeast can start to mutate, potentially changing the flavor profile or losing its ability to flock out (flocculate) properly. If your beer starts tasting different than usual, it’s time to retire that culture and start fresh.
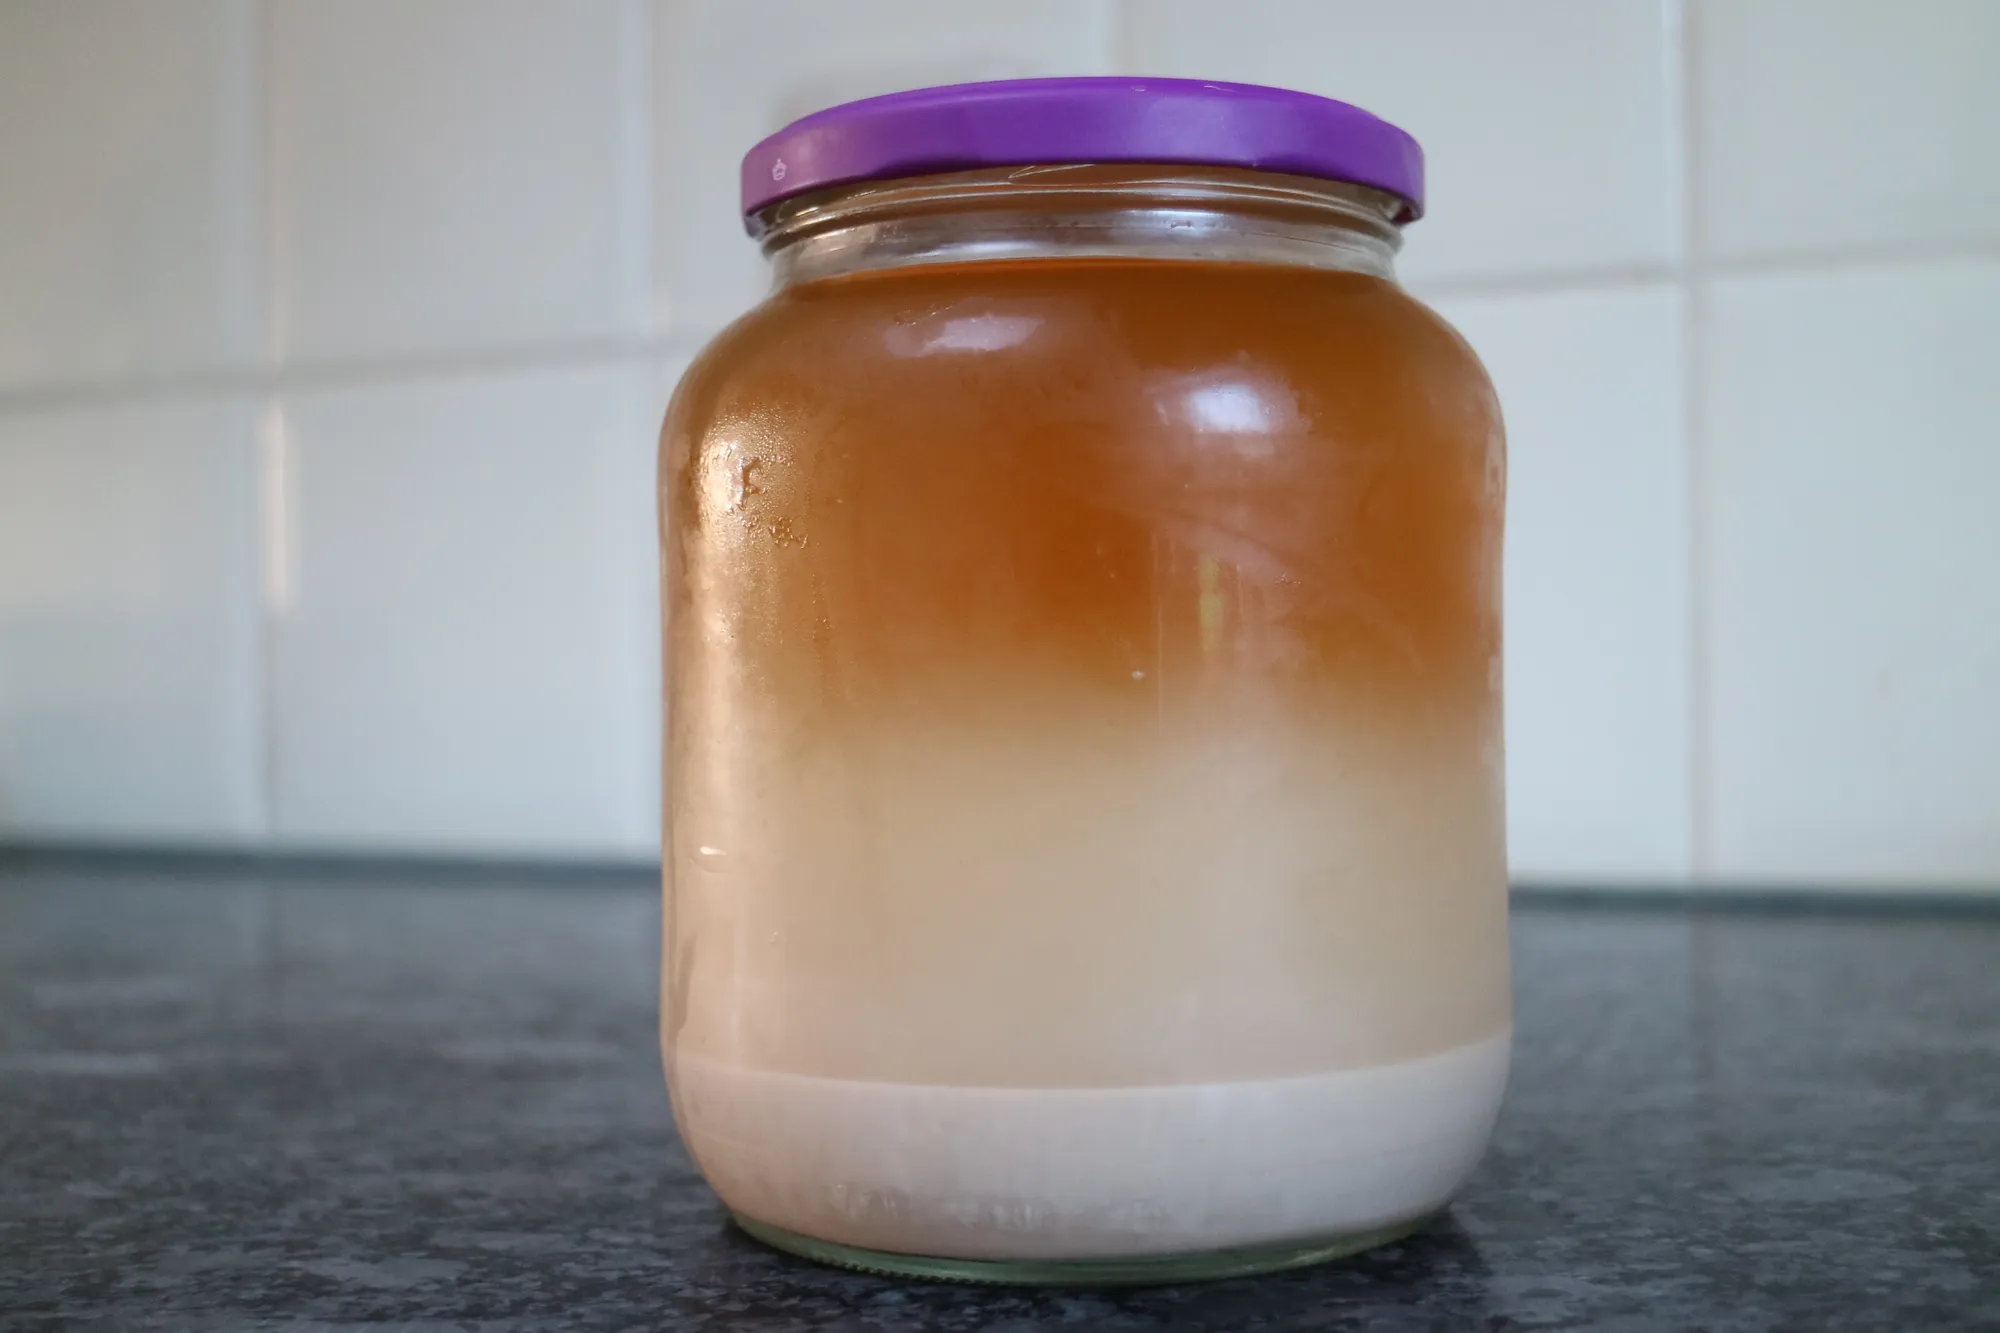
You’ll typically see a layer of beer on top, a creamy white layer in the middle, and a darker, grittier layer at the bottom. The creamy middle layer is your liquid gold—that’s the healthy, active yeast. The bottom layer is mostly “trub” (hop debris and dead cells). When pitching, try to tip the jar to get as much of that middle white gold as possible.
Absolutely! Once dry yeast is rehydrated and has finished a fermentation, it behaves exactly like liquid yeast. In fact, many brewers find that “Generation 2” of a dry yeast like US-05 or S-04 often performs even faster and cleaner than the first pitch from the sachet.
No, keep it closed. Once yeast is stored in the fridge it goes dormant and doesn’t need oxygen, and a sealed jar helps protect it from contamination. However, if you store the slurry shortly after fermentation it may still release small amounts of CO₂. In that case, either leave the lid slightly loose or briefly “burp” the jar during the first day or two to avoid pressure buildup.
In summary, brewing with yeast slurry is a great way to save money and maintain consistent fermentation characteristics in your beer. By following these tips and best practices, you can successfully use yeast slurry in your brewing process.